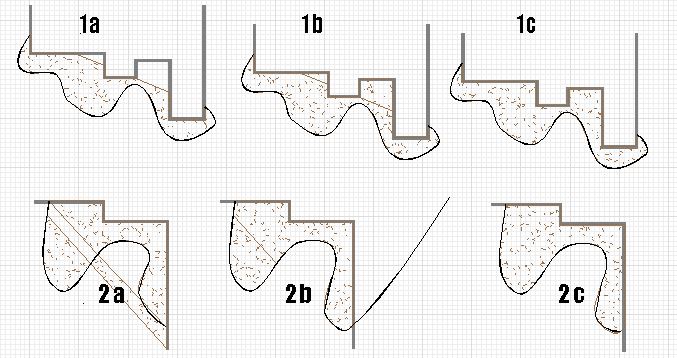
 When using the Mulch Fill tool you may come up on a couple senarios which may cause you grief. In the figure 1a, we have a complex curve around a foundation wall and when we used the Mulch Fill tool, it left a couple areas unfilled. In figure 1b, we used the Mulch Fill tool to fill in the missed areas, but it left a line between the filled areas. Beginning in version 20, we added a Join Mulch tool. What we do here in click on the larger filled area and hold the shift key down and click on the smaller filled areas so that all three are selected. Now, right click on the selected mulch areas and select Join Mulch(s). Note the areas need to be overlapping or side by side without gaps.
On the second set of figures (2a) when attempting the technique above we get a strange result do to the program not knowing which side of the edging to fill. To fix this, we double clicked the edging to get into the Edit Vertice mode and added another point and moved the point up and to the right. We moved this point to extend the edging so fill tool would fill properly. We filled the upper area of the bed with the Mulch Fill tool. We again double click the edging to get into the Edit Vertice mode and delete the right most end of the edging to go back to the original position. Now, we can use the Join Mulch tool as we did in the first example. The result is shown in 2c.
Note: These same techniques may be used with the grass fill tools.
Version 19 and lower users will need to double click the mulch to get into Edit Vertice mode and add new points to compensate for the missed areas..
When using the Mulch Fill tool you may come up on a couple senarios which may cause you grief. In the figure 1a, we have a complex curve around a foundation wall and when we used the Mulch Fill tool, it left a couple areas unfilled. In figure 1b, we used the Mulch Fill tool to fill in the missed areas, but it left a line between the filled areas. Beginning in version 20, we added a Join Mulch tool. What we do here in click on the larger filled area and hold the shift key down and click on the smaller filled areas so that all three are selected. Now, right click on the selected mulch areas and select Join Mulch(s). Note the areas need to be overlapping or side by side without gaps.
On the second set of figures (2a) when attempting the technique above we get a strange result do to the program not knowing which side of the edging to fill. To fix this, we double clicked the edging to get into the Edit Vertice mode and added another point and moved the point up and to the right. We moved this point to extend the edging so fill tool would fill properly. We filled the upper area of the bed with the Mulch Fill tool. We again double click the edging to get into the Edit Vertice mode and delete the right most end of the edging to go back to the original position. Now, we can use the Join Mulch tool as we did in the first example. The result is shown in 2c.
Note: These same techniques may be used with the grass fill tools.
Version 19 and lower users will need to double click the mulch to get into Edit Vertice mode and add new points to compensate for the missed areas..